When it’s time to replace your Google Nest Protect’s batteries, it chirps continuously until the batteries have been replaced.
Note: If you add your Protect to the app and you get a notification that the batteries are low, the voltage may have temporarily dropped. Troubleshoot when Nest Protect batteries seem low during setup.
Protect requires lithium batteries
Both battery and wired Protect require Energizer Ultimate Lithium AA (L91) batteries.
Don’t use rechargeable or alkaline batteries. If you do, they will quickly drain and will need to be replaced soon after installation.
- Using other types of batteries than the ones recommended by Nest is detrimental to the smoke and CO alarm operation.
- Don’t mix and match batteries.
- Don’t place new batteries in with old batteries.
How to tell when Protect needs new batteries
When the batteries get low:- The Nest app or Google Home app notifies you.
- Protect’s light ring pulses yellow when you turn off the lights at night.
- You’ll get a message during Nightly Promise.
- When the batteries are very low, your Protect chirps until the batteries are replaced.
Check the battery charge level
Check Protect’s battery level
On your Nest app
- Open the Nest app
.
- Select the Protect that you want to check.
- The battery status and the last time the battery level was checked by Protect’s Self Test should appear on this page.
On your Home app
- Open your Home app
.
- Tap Favorites
or Devices
.
- Tap your Smoke & CO alarm’s tile and select the device name.
- The battery status and the last time the battery level was checked by Protect’s Self Test should appear on this page.
Nightly Promise
Protect’s Nightly Promise lets you know everything works, and that the batteries are at a safe level. If the batteries get low, Protect will have a yellow light and you’ll get a message telling you to replace the batteries soon.
You can also check the battery level at any time with the Nest app or Home app.
Wired and battery-powered Protects both use batteries (wired has batteries for backup power) but each have their own unique behavior depending on their battery charge level.
Battery-powered Protect
Wired Protect
Replace your Protect's batteries
Each kind of Protect has different instructions on how to replace the batteries. Check which kind of Nest Protect you have before you start. Select the kind of Protect you have to learn how to replace the batteries.2nd gen battery-powered Nest Protect
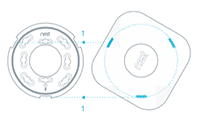
| 1. Remove your Nest Protect from its backplate. Turn it counter- clockwise until it comes loose. |
 |
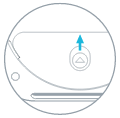
| 2. Push the battery door button in the direction of the arrow. The door springs open. |
 |
| 3. Replace all of the batteries with new Energizer Ultimate Lithium AA batteries (L91). Be sure to match the positive "+" and negative "-" ends of the batteries with the markings in the battery compartment. |
 |
| 4. Close the battery door. It clicks into place. For your safety, the battery door doesn't close until all 6 batteries are inserted. |
 |
| 5. With the notches on the bottom of your Nest Protect as a guide, place your Nest Protect against its backplate and turn it clockwise until you feel the backplate grip. |
 |
|
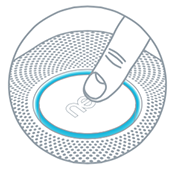
6. Press the center button twice to test your Nest Protect. This helps make sure you’ve replaced the batteries correctly. |
 |
2nd gen wired Nest Protect
| 1. Turn the power to your Nest Protect off at the breaker box. | 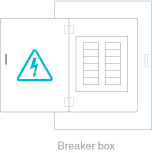 |
| 2. Remove your Nest Protect from its backplate. Turn it counter- clockwise until it comes loose. |
|
| 3. Detach the power connector. |  |
| 4. Push the battery door button in the direction of the arrow. The door springs open. |
|
| 5. Replace all of the batteries with new Energizer Ultimate Lithium AA batteries (L91). Be sure to match the positive "+" and negative "-" ends of the batteries with the markings in the battery compartment. |
 |
| 6. Close the battery door. It clicks into place. For your safety, the battery door doesn't close until all 3 batteries are inserted. |
|
| 7. Reattach the power connector. | |
| 8. With the notches on the bottom of your Nest Protect as a guide, place your Nest Protect against its backplate and turn it clockwise until you feel the backplate grip. |
|
| 9. Turn the power back on at the breaker box. | |
|
10. Press the center button twice to test your Nest Protect. |
|
1st gen battery-powered Nest Protect
| 1. Remove your Nest Protect from its backplate. Turn it counter- clockwise until it comes loose. |
|
| 2. Using a Philips screwdriver, unscrew the 2 screws from the battery door. |  |
| 3. Replace all of the batteries with new Energizer Ultimate Lithium AA batteries (L91). Be sure to match the positive "+" and negative "-" ends of the batteries with the markings in the battery compartment. Push down the small latch at the bottom of the battery compartment so that you can insert the last battery and properly close the battery door. |
  |
| 4. Reattach the battery door. Slide it into the tabs located on the opposite side of the batteries and replace the screws. For your safety, the battery door doesn't close until all 6 batteries are inserted. |
 |
| 5. Place your Nest Protect onto its backplate and turn it clockwise until you feel the backplate grip. |
 |
|
6. Press the center button twice to test your Nest Protect. This helps make sure you’ve replaced the batteries correctly. |
|
1st gen wired Nest Protect
| 1. Turn the power to your Nest Protect off at the breaker box. | |
| 2. Remove your Nest Protect from its backplate. Turn it counter- clockwise until it comes loose. |
|
| 3. Detach the power connector. | 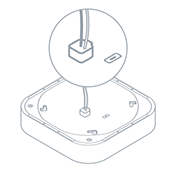 |
| 4. Using a Philips screwdriver, unscrew the 2 screws from the battery door. | |
| 5. Replace all of the batteries with new Energizer Ultimate Lithium AA batteries (L91). Be sure to match the positive "+" and negative "-" ends of the batteries with the markings in the battery compartment. Push down the small latch at the bottom of the battery compartment so that you can insert the last battery and properly close the battery door. |
|
| 6. Reattach the battery door. Slide it into the tabs located on the opposite side of the batteries and replace the screws. For your safety, the battery door doesn't close until all 3 batteries are inserted. |
|
| 7. Reattach the power connector. | |
| 8. Place your Nest Protect onto its backplate and turn it clockwise until you feel the backplate grip. | |
| 9. Turn the power back on at the breaker box. | |
|
10. Press the center button twice to test your Nest Protect. This helps make sure you've replaced the batteries correctly. |
|