リクエストしたページは現在、お客様の言語ではご利用いただけません。ページの下部で別の言語を選択できます。または、どのウェブページでも、Google Chrome の翻訳機能を使ってその場でお好みの言語に翻訳できます。

Troubleshoot when nothing happens after removing 1st gen Nest Protect's battery tab

This article is for 1st gen Nest Protect. Check which Nest Protect you have.

If you don’t see a blue light or hear the welcome message after removing the battery tab, the batteries may need to be re-seated. To fix the problem, you will need to remove the batteries and clean out any pieces of the battery tab that are left in the battery tray.

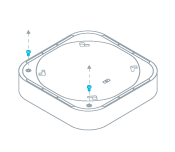
Here’s how:

1. Remove the two screws on the back of Nest
Protect with a small Phillips screwdriver and
take off the cover.

2. Remove the batteries in each battery tray,
make sure no pieces of battery tab remain, and
reset the batteries in the proper orientation.

3. Press down on each battery to make sure
that both ends are touching the Nest Protect
contacts.

Note: You will need to push the spring-loaded
battery so it stays out of the way to get the third
battery into each tray.


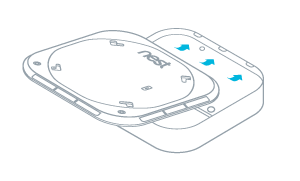
3. Once the batteries are reinstalled, reattach
the battery door by sliding it into the tabs
located on the opposite side from the
batteries and replacing the screws.


Nest Protect remove dancefloor

Nest Protect battery stays

Nest Protect replace dancefloor

この情報は役に立ちましたか?

改善できる点がありましたらお聞かせください。
Search
Clear search
Close search
Main menu
3307052529927058606
true
ヘルプセンターを検索
true
true
true
true
true
1633396
false
false
false
false